As it has now become known, the process of global warming is also manifested in the form of sudden cold snaps. Winter in the Moscow region was marked by cold weather of -30 ° C. For many summer residents, this resulted in material losses, in particular due to the freezing of water in the pipes. After that winter, I decided to additionally insulate the walls of the house made of foam concrete. In the house there is a toilet and a shower, functioning all year round. At the same time, I planned to improve the appearance by finishing the facade with siding or clapboard.
Operating procedure
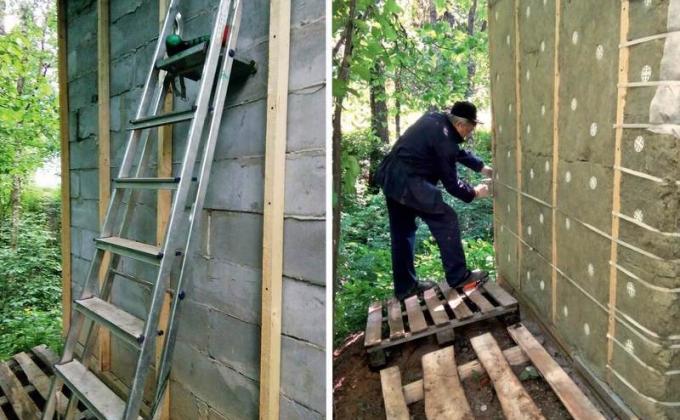
- For the installation of the insulation, I attached wooden blocks 40 × 50 mm with the narrow side to the wall to the wall. The bars were fastened vertically at a distance of 59 cm from one another, and a horizontal bar was attached to the very bottom of the wall. He attached the bars directly to the wall with long self-tapping screws (100 mm) for wood and drywall and special dowels for foam concrete. I did not like fastening through the dowels - I decided that it was better to take longer screws and screw them in more often without dowels. The upper ends of the bars were screwed to the wooden parts of the roof with self-tapping screws. For self-tapping screws in the bars, I drilled holes with a drill with a diameter of 6 mm in increments of about 30 cm.
We insulate the dacha
As a heater, I chose heat and sound insulation material. It is a non-combustible mineral wool sold in the form of flat plates measuring 60 × 100 × 5 cm.
Operating procedure
-
For the installation of the insulation, I attached wooden blocks 40 × 50 mm with the narrow side to the wall to the wall. The bars were fastened vertically at a distance of 59 cm from one another, and a horizontal bar was attached to the very bottom of the wall. He attached the bars directly to the wall with long self-tapping screws (100 mm) for wood and drywall and special dowels for foam concrete. I did not like fastening through the dowels - I decided that it was better to take longer screws and screw them in more often without dowels. The upper ends of the bars were screwed to the wooden parts of the roof with self-tapping screws. For self-tapping screws in the bars, I drilled holes with a drill with a diameter of 6 mm in increments of about 30 cm.
-
For fastening to the wall, I used the so-called fungi, for which I drilled holes in the foam concrete with a drill with a diameter of 10 mm.
To fix one plate, I used 6 fungi, distributing them approximately evenly over the plate.
Complemented the support of the insulation with packing tape from pallets with foam concrete.
After mounting the plates, my young assistant drew attention to the strange sensations that arise when you bring your ear to the wall. I checked - it turned out that street sounds are not reflected at all from the insulation, and an unexpected, almost ringing silence arises in the ear from the side of the wall.
And one more interesting circumstance. I kept the insulation under a shed. In winter, some animal (probably a cat) found an open package and made a cozy and warm nest in it. Insulation plates are hydrophobic, that is, they repel water and hardly get wet. However, for all the environmental friendliness of the material, it is recommended to work with it with gloves and a dust mask.
-
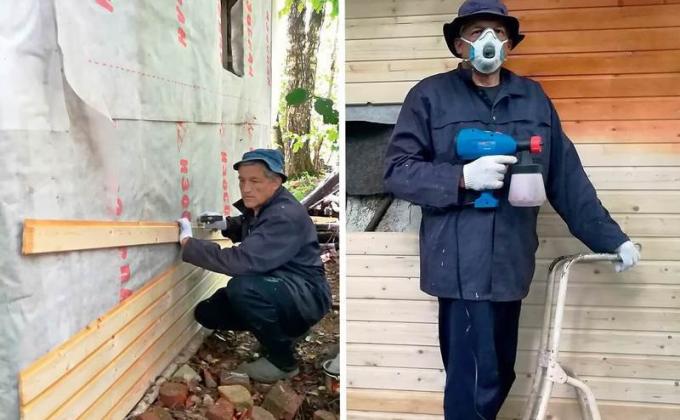
After fixing the insulation to the wall, we covered it with a vapor-permeable windproof material to protect it from swelling and damage. The covering material was attached to the bars with a stapler.
Thus, the wall received additional insulation - and is ready for further finishing. The rest of the walls are insulated in the same way. -
The choice between siding and clapboard was made directly in the nearest building store. We didn't like the color of the available siding - we decided to buy a lining. The difference in price did not stop us.
-
The first row of the lining was leveled. They nailed the boards with thin galvanized nails for the lining, trying to get them into the bars.
-
It is better to paint in warm and not windless weather, so that the protective and decorative coating dries faster. Better to leave to dry for a week, then it will be much more pleasant to nail.
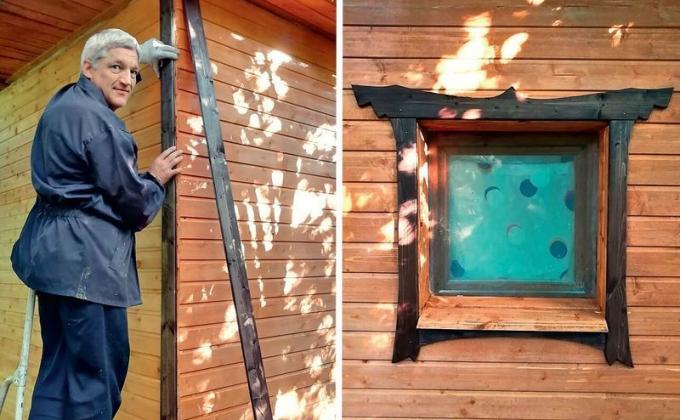
The main color of the wall is pear. The dark one is rosewood. Painted in two layers with a spray gun.
We painted in two layers. The drying time of the first coat before applying the second is approximately one hour. Paint consumption approx. 3 liters per 18 m² when painting in two layers. If you practice a little and get used to the spray gun ("it's better to lose a day ..."), then the unevenness of the painting is almost imperceptible, and the result is achieved much faster than when painting with brushes.
- Corners and platbands are made of the same lining and painted in the maximum contrast to the color of the wall in rosewood in two layers. The details were painted separately, after drying they were attached to the wall. The hastily cut frames of a small window are vaguely similar to the frames of the windows of an old house.
Working with wood is always a great pleasure, and modern decorative and protective coatings will extend the life of the tree and decorate the facade according to your taste.